
Wednesday, 12 May 2010
Water movement
In this set of photographs the method used is very similar to the time lapse photographs that I have produced of light trails. By using a long exposure time for the majority of these photos it prodes a very interesting profound image. When I initially strated taking these photos down at a river thart runs past the outskirts of my town (the river dart) I found that it bacame highly adictive trying to get the right photo, which was particuarlly difficult due to the amount of light that was being reflected from the sun on to the water.
 It took me some time to figure out and arrange the settings on my camera to produce a picture that did not have too much light exposure. This first picture shown shows the trouble I had with the light, Even though I had a very short exposure time of less than a second there was still far to much light bouncing of the water towards the camera. Even so there are still points with in the photo that I am satisfied with, for example the area to the middle left of the photo has not shown up as white as the other areas, the water looks smooth with due to the small length of exposure and the fact it is darker than the other areas of the photo. The reason for there being so much light exposed to the camera is due to the white rapids ( that can not be seen) because the rapids are white and foamy the light from the sun reflects of this far more than the rest of the picture. in order to avoid so much light being exposed I had to put adjust the appature on the camera. Adjusting the apature on the camera is controlling how much light passes through the lense.
After initially learning that light reflects easily of the white rapids in water and that the appature needed adjusting on my camera I began to produce some reasonable photographs. In the next photo shown I chose a place on the river that did not have as many white rapids and also a place that had a bit more detail such as rocks and sticks. By having things like rocks and sticks with in the shot it gives the camera something to focus on, this takes the attention of the white rapid part of the photo and therefore not as much light is exposed. I feel that in this photo I have captured just the right amount of light, the water flows smoothly across the picture, which is the effect that I desired as it captures a sense of movement perfectly.

 This next picture that I have taken is situated within the same part of the river, I prefer the shot because firstly I feel that it works better as it has been taken in portrait. Secondly I have edited theis picture in photoshop. using photoshop is an aspect of photography that I enjoy. I played around with what is known as 'curves' on photoshop, which highlights or tones down certain areas of the picture. I also lowered the exposure with in the photograph. By doing these things I have bought forward the detail and colour on the rocks and other deatil in the photo. It has also highlighted the way the water moves over the the river bed, which is ulitamtely what I am aiming to do as I am studying movement. By ultering the curves in the photo i have emphasised the deep blue with in the photo adding detail to the water and therefore emphasising the movement of the water acros the photograph.

I feel that this photgraph works really well as it has such a soft smooth tone to it. The lighting with in the photograph projects subtle colours with in the photograph. The long exposure time that i have used produces a mist of water across the picture. I really feel that the green moss on the rocks adds a lot of texture and detail to the picture. The reason using a lng exposure time with when taking photogrpahs produces whis sort of effect is beacuase when the shutter opens it begins to take in light and when it closes it stops taking in light. So when taking this picture the shutter opens and takes in the light (which is what produces the photo) as the shuttter is open the water is still moving across the lens, the shutter then closes and stops taking in light. The finished picture has taken in captured the movement of the water over a short period of time which is what creates the effect shown.
It took me some time to figure out and arrange the settings on my camera to produce a picture that did not have too much light exposure. This first picture shown shows the trouble I had with the light, Even though I had a very short exposure time of less than a second there was still far to much light bouncing of the water towards the camera. Even so there are still points with in the photo that I am satisfied with, for example the area to the middle left of the photo has not shown up as white as the other areas, the water looks smooth with due to the small length of exposure and the fact it is darker than the other areas of the photo. The reason for there being so much light exposed to the camera is due to the white rapids ( that can not be seen) because the rapids are white and foamy the light from the sun reflects of this far more than the rest of the picture. in order to avoid so much light being exposed I had to put adjust the appature on the camera. Adjusting the apature on the camera is controlling how much light passes through the lense.After initially learning that light reflects easily of the white rapids in water and that the appature needed adjusting on my camera I began to produce some reasonable photographs. In the next photo shown I chose a place on the river that did not have as many white rapids and also a place that had a bit more detail such as rocks and sticks. By having things like rocks and sticks with in the shot it gives the camera something to focus on, this takes the attention of the white rapid part of the photo and therefore not as much light is exposed. I feel that in this photo I have captured just the right amount of light, the water flows smoothly across the picture, which is the effect that I desired as it captures a sense of movement perfectly.
 This next picture that I have taken is situated within the same part of the river, I prefer the shot because firstly I feel that it works better as it has been taken in portrait. Secondly I have edited theis picture in photoshop. using photoshop is an aspect of photography that I enjoy. I played around with what is known as 'curves' on photoshop, which highlights or tones down certain areas of the picture. I also lowered the exposure with in the photograph. By doing these things I have bought forward the detail and colour on the rocks and other deatil in the photo. It has also highlighted the way the water moves over the the river bed, which is ulitamtely what I am aiming to do as I am studying movement. By ultering the curves in the photo i have emphasised the deep blue with in the photo adding detail to the water and therefore emphasising the movement of the water acros the photograph.
I feel that this photgraph works really well as it has such a soft smooth tone to it. The lighting with in the photograph projects subtle colours with in the photograph. The long exposure time that i have used produces a mist of water across the picture. I really feel that the green moss on the rocks adds a lot of texture and detail to the picture. The reason using a lng exposure time with when taking photogrpahs produces whis sort of effect is beacuase when the shutter opens it begins to take in light and when it closes it stops taking in light. So when taking this picture the shutter opens and takes in the light (which is what produces the photo) as the shuttter is open the water is still moving across the lens, the shutter then closes and stops taking in light. The finished picture has taken in captured the movement of the water over a short period of time which is what creates the effect shown.
A lot of thw pictures that I took at the river contain rapids which produce a mosty effect when captured with a long exposure. With in this next photo I have not captured rapids but just a smooth flow of water. the detail of the water shown in this photo seems to be a lot clearer, this is due to where I took the photo and the fact there is not as much light with in this area. I took the photounder a bridge, this enabled a lot of shade so i could produce a photograph that does not take in as muh light as the area is not being as exposed to the sun. The log in the centre of the photo adds detail to the photo and enables focus for the camera. The way the water runs over the log it moves smoothly of the other side, this is due to the long exposure. In comparision the the other photogrpahs I have taken of water this on eis different as it showns detail around the water, under the water ( rocks can be seen) and there is still a smooth sense of movement created by the water.

This photo is situated in the same place under the bridge as the last one. It was photogrpahed on a different day where there was much more sunshine. I wanted to create a larger sense of movement by using a longer exposure time, I found this was diificult as there was to much exposure due to the sun light. To try and minimize the amount of light being taken in by the camera I managed to drag a log under the bridge 9 that can be seen sticking up) this added a bit more focus to the photograph taking the attention o the light being exposed due o the white rapids. The drift wood log that i placed in the water works really well with the smooth and elogant flow of water that is created. I still struglled to tone down the light produced in the photo, so I had to use photoshop to minimise the bright white that could be seen.

I have published this photogrpah to show my development in the technique of photographing water using long exposure time. When i initially started using long exposures to photograph the water I struggled to catch deatil with in the photo, all I could seem to capture was a white mass of light and soem water. This photo shows that i have nmangaed to figure out an exposure times and use the right setting to capture the movement of water and the detail of the log and rocks and matter on the river bed.
A lot of the photographs that I have produced have been relatively close up, this particular photograph that have taken is a step back fromt hat others that I have taken
it shows a larger view of the river which contains the suroundings around the river. This makes the picture more appealing to look at for the viewer as ther are aspects involved in the photo that arent just the river.

I have taken these next 2 photo just to show the difference between what a normal photograph of the water would have loooked like in comparison to the others I have produced using a long exposure time. The picture taken with a short exposure time do still capture a sense of movement but in a differnent way to the photos taken using a long exposure time. The water is captured in an instant freeze frame, every water droplet is stopped in its path and captuerd within one photo. these are two very different effects created by my photogrpahy.


In some ways I prefer these photos were that are caught instantly. The image created is clearer and crisper and i can really imagine the feel of the water. But at the same time I really like the photos taken using a long exposure time as they create a smooth soft tone to the picture whilst capturing a sense of movement.

These two photographs were taken in the yorkshire dales. Me and my family took a walk up a valley in which a number of water falls were situated. This particular waterfall was the largest. I felt that photographing this waterfall was a good way of capturing a sense of movement. As the water piles over the top of this cliff it turns into a mist and plumets down to the river, all of this is caught within one image. I like this image a s it does not only show a small amount of movement but in this photo a large amount of movement is occuring.

This image is taken from the same waterfall, but from behind the waterfall. I had to climb round a ledge and sit under the water falling down. The image caught shows the water falling in a still. I feel that this is not as effective as the other image that I produced as you can not see the mass of water as water aswell. The water the water sits in a still in the air works well as it captures the sense of movement that I aim for. Photographing water to capture movement has enabled me to develop new techniques with in photography. I have gained various abilities with in photography that have given me an oppurtinity to produce movement with in photography. I plan to use these skills and techniques with in the other areas and aspects of movement that i plan to look at.
Friday, 12 March 2010
Movement caught in a still

As interesting as it is using other methods to capture movement in my photography I feel that when it is caught in a still it adds real character to to the photograph. When we see an image fixed on a position i a photograph it is as if we are there at that exact event and that very moment has been caught in time. I particuarlly like the photo on the left of my freind jumping from a rock in Torquay. This photograph was what really inspired me to start looking at more movement that was caught in a still image. It is obvious that all photographs are still images but the sort of photographs I am experimenting with are particually still, for example, in this first photograph the position on of the characters body pasticuarlly emphasises a fixed moment (his legs apart and arms raised in the air). The boy on the rock and the character in the water also emphasise the idea of a fixed moment in time, for me both these characters enable me to imagine a fixed moment in time as they gaze at the jumping character.The blue sky and dark green water work really well in this photograph as they highlight and dipict the out line of the subject. The cliff face in the foreground of the photo adds detail, texture and bringas the image to life that little bit more.

I find trying to capture these sorts of image so interesting as they are so hard to catch! Its like sports photogrpahy, as the subject is usually moving around or in a paricualar direction at high speed it becomes a challange to capture the desired image, but when you do capture them they seem to work reall well. This photograph is a favourite of mine! I think the fact it was taken on a particuarlly sunny day helps but the way the subjects (my freind) is positioned adds a lot of character and interest to the photograph: he i face down arms out with his legs tuked in. The fact that this is such an unusual position is what makes the picture so appealing. When taking these photos of people jumping from rocks into the sea I found that I was usually taking them either from below them or directly from a side angle, what makes this photo so different is the way it is taken from above the subject and at a slight angle. By taking it from this view it has enables me to capture the jump from a different perspective and still keep it appealing and interesting. All the colours in this photograph seem to complement each other, the green sea and the blue sky along with the sun and clouds all bring a warmth to the photo. The small bit of rock in the bottom left adds detail and cotrast as it is a whole new colour and texture in comparison to anything else in the photo.
 its is not only the movement caught in this photograph that makes it appealing but the style and camera angle appeal to me. I was at my local park just kicking a ball around and just happened to have my camera on me , I was lying down and took a picture of my brother a he was diving. By lying down and taking the photo I feel that I have produced a interesting photograph; initially at the bottom of the photo a close up of the grass can be seen which adds detail and colour to the fore ground of the photograph, this then leads up to the centre of the photo where the subject can be seen diving across the photograph, in the backround houses and as suburban scene can be seen, to the lead up to the sky which has a tremendous amount of detail due to the clouds and the shadows created by the sun. ultimely creating a particuarlly appealling photogrpah. The sense of movement caught in the photo is rather intereging, the way the dive is caught on camera ;ppls very much as if he is just about to spring from hisleft foot. He throws his weight forward and streches his arms out and begins to kick out huis legs, creating an abstract sense of movement when caught on camera.

After unitentionally capturing the photo before I decided to experiment with the idea of taking photos involving movement from a low angle. In this photo I got my brother to run and jump in the air, the position that he is in when the picture is captured is interesting. he has his arms out straight, to me it looks as if he is holding on to something such as a kite being dragged through the aire. The blue and white sky from the clouds in the background works well as irt helps highlight and depict his outline. The whole photo works in a similar way to the previous one expect this one is at a slightly obscure angle. As you can see the ground does not run parrallel to the bootom of the photo. i think the abstract angle works helps higlight the sense of meovement with in the photo.

Within this photo my brother performed a side flip, when the image was caught he was springing from his hand. This posture caught in the image captures the perfect sense of movement that I was aiming for. It is almost as if he is in a hand stand holding himself in the air. When looking at the photograph the it is easy to imagine the route that he has taken i.e you can imagine him begining the flip right up untill the point captured with in the image. The anlge used with in this photo works well: the close up of the grass and the bootom of the photograph adds deatil and colour to the photo whereas the sjy line adds a bold vibrant feel to the photograph.

 its is not only the movement caught in this photograph that makes it appealing but the style and camera angle appeal to me. I was at my local park just kicking a ball around and just happened to have my camera on me , I was lying down and took a picture of my brother a he was diving. By lying down and taking the photo I feel that I have produced a interesting photograph; initially at the bottom of the photo a close up of the grass can be seen which adds detail and colour to the fore ground of the photograph, this then leads up to the centre of the photo where the subject can be seen diving across the photograph, in the backround houses and as suburban scene can be seen, to the lead up to the sky which has a tremendous amount of detail due to the clouds and the shadows created by the sun. ultimely creating a particuarlly appealling photogrpah. The sense of movement caught in the photo is rather intereging, the way the dive is caught on camera ;ppls very much as if he is just about to spring from hisleft foot. He throws his weight forward and streches his arms out and begins to kick out huis legs, creating an abstract sense of movement when caught on camera.
After unitentionally capturing the photo before I decided to experiment with the idea of taking photos involving movement from a low angle. In this photo I got my brother to run and jump in the air, the position that he is in when the picture is captured is interesting. he has his arms out straight, to me it looks as if he is holding on to something such as a kite being dragged through the aire. The blue and white sky from the clouds in the background works well as irt helps highlight and depict his outline. The whole photo works in a similar way to the previous one expect this one is at a slightly obscure angle. As you can see the ground does not run parrallel to the bootom of the photo. i think the abstract angle works helps higlight the sense of meovement with in the photo.

Within this photo my brother performed a side flip, when the image was caught he was springing from his hand. This posture caught in the image captures the perfect sense of movement that I was aiming for. It is almost as if he is in a hand stand holding himself in the air. When looking at the photograph the it is easy to imagine the route that he has taken i.e you can imagine him begining the flip right up untill the point captured with in the image. The anlge used with in this photo works well: the close up of the grass and the bootom of the photograph adds deatil and colour to the photo whereas the sjy line adds a bold vibrant feel to the photograph.

At 7 o'clock one morning i found my self on dartmoor watching the sar of the ten tors event 2010. As the teams walked of away from the sarting point they all collectively joind a path and snaked of up a hill. The reason I have used this photograph with in my coursework is because of the way that the team walking up the hill represent movement. A lot of the movement photography that I have looked at has been movment that is very quick and instant, for instance I photographed some one jumping from a cliff. The aspect of movement that #I have caught with in this photograph is slow and prgressional. Although I prefer photographing fast movement I thought it would be good to look at a different side of it, so i could experiment with this with in my coursework.

This photo was taken on the same day at the start of the ten tors event. Again it represents a slow progressional movement as the tams move up the hill. instead of them moving in a line they all move seperately up the hill which works well with in this image as it shows a large mass of movement. Both the last two photos have quite an old effect to them, this is due to the colour and tone created by the photo. As it was early in the morning the mist was down over the moor creatin an erie mood which I feel works well with in these photo's.

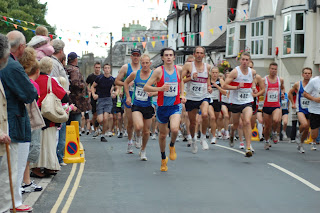 Through out my coursework I have always intended to capture a sense of movement with in a running shot, as i am a keen runner it has always been of interest with me. I particuarlly like this photo as it really does capture a sense of movement. a sense of movement is caught with in each runner as they lift there feat and move though the street. I feel that this photograph works well, the focus is on the runner at the front of the photograph with the guy in the yellow shoes then the rest of the runners follow in a large group of moving subject. Not only does this photograph work well at capturing a sense of movement but as a generally interesting photograph it is appealing to look at. The array of colours with in the photo such as the reds and yellows creates a vibrant intersting photograph.


This photo was taken on the same day at the start of the ten tors event. Again it represents a slow progressional movement as the tams move up the hill. instead of them moving in a line they all move seperately up the hill which works well with in this image as it shows a large mass of movement. Both the last two photos have quite an old effect to them, this is due to the colour and tone created by the photo. As it was early in the morning the mist was down over the moor creatin an erie mood which I feel works well with in these photo's.


Tuesday, 10 November 2009
Movement caught in stages

One particular technique that i have used to capture movement within my photos is presenting images in stages (as shown). For this particular technique I used a fast shutter speed and set my camera to multishot, giving me a set of photos that where taken in a very short space of time. This enabled me to capture the whole sequence of both the jumps in to the water. After taking the photos I used photoshop to layer each photo on top of one another eventually merging all the images into one. Although each individual image in the photos is static there is still a sense of movement within the photograph. I feel that where these photos where situated really compliments the idea of movement with in the image, the grey rock adds texture and contrast to the photo, whilst the sea and the sky show bold, solid colour. The solid colour in both the sea and sky depict and highlight the figures in the photo therefore emphasizing the use of movement.

In the first photo the majority of the figures in the photos are solid which creates a clear cut precise photo. In this photo the figures are slightly faded. I felt that experimenting with the idea of fading some of the figures whilst layering them would emphasize the movement with in the image. I reduced the opacity in some of the images to almost create the same effect that blur has in an image. The central figure with in the image has been left solid, for me this brings the photo to life. If all the figures had been left faded the photo would have the feel of the past i.e. this is an event that has already occurred. The central image creates the sense of this is happening now and helps the viewer have an insight into what it was like when this picture was taken.
Friday, 6 November 2009
Capturing movement with blur

\\


ss

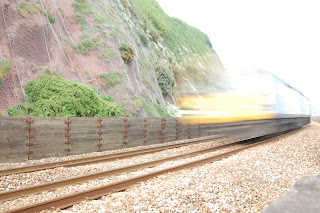
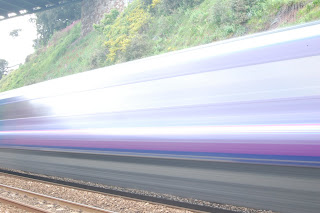
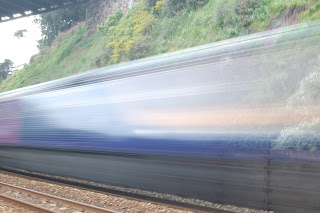
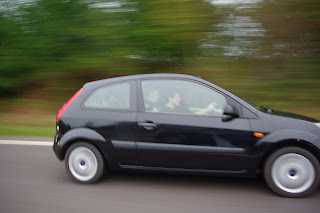
usually blur is undesired in photography, in this instance I have tried to capture a sense of movement by using blur. This particular photo was t
aken at the car traveling at high speed on the duel carriage, to avoid capturing to much blur (which would have caused the photograph to be just one big blur) I had to travel in another car along side the one situated in the image. i feel that this technique really worked well as the car can be clearly seen but there is still a sense of movement. The cocktail of green blur in the background highlights the car.


Tuesday, 3 November 2009
Capturing movement with light


 For these particular photographs I used a long exposure time to produce light trails. I experimented with various exposure times i.e some photos that I took were exposed for too long and some for too little amount of time, for this particular photo shown to the left I used an exposure time of about 30 seconds and I feel that the image produced works well. The image shown on the left was taken from the central reservation of the dual carriageway, this shows both the tail and front lights of the cars producing a trail of both red and white lights. I feel that this works particularly well as the two colours add contrast and definition to the photo.
The way the light is reflected in this image particularly catches the viewers eye. As the light begins in the distance it can be seen as a collective mass of light as it moves down the image the light becomes more defined leaving a thin stream of white moving off the page. This stream of white reflects on the road illuminating and highlighting details on the side of the road adding detail and texture to the image. A particuarlly interesting aspect of this image os the way the light trail follows the road creating a bend of light across the page.

The overall outcome of this image works well as several different light trails move across the page. Compared to the other images that I have developed this particular one, to me stands out. This is because the other photographs that I have produced have been taken from the side or centre of a darkened dual carriage way, this photo was taken from a bridge above a round about and due to the street lamps a lot more detail can be seen in the photo which works really well with these light trails. I had to use a longer exposure time for this photo than I did for the others. This is because the cars where moving slower than on the dual carriage way and because I intended to capture more light trails as the cars moved a round the round about. What makes this photo so interesting is the way that the light trails tail of from different areas of the round about and join together to then leave the round about again. The smooth curves that the light trails have created pleasing to look at for the viewer and create a sense of smooth elegant movement.
 After taking a series of photograhs of light trails produced by traffic on the dual carrage way I was inspired to produce photographs using light in the same way but in a different sittuation. After looking at the work of .......... I decided to produce .
Subscribe to:
Posts (Atom)